

 Tiếng Việt
Do you know how to sew an insulated bag? If not, don’t skip this short guide. In reality, the basic How to sew an insulated bag method is not difficult at all — you can do it entirely at home. All you need is the right materials, a little skill, and to follow each step in order. You’ll end up with a beautiful, unique insulated water bottle bag that’s one of a kind — no worrying about it looking the same as anyone else’s!
In this article, May Hop Phat guides you through the most detailed insulated water bottle bag sewing method available.
What is an Insulated Bag?

Before diving into how to sew an insulated water bottle bag, let’s first understand what an insulated bag is. Insulated water bottle bags — and thermal bags in general — all serve the same core function: heat retention. Their primary purpose is to preserve and maintain the temperature of food containers, water bottles, and similar items, keeping their contents as fresh and enjoyable as when they were first prepared.
Structure of an Insulated Bag
Typically, an insulated water bottle bag is made up of 3 main layers:
Outer Fabric Layer
The material used for the outer layer is a key factor that directly affects the quality of the finished product. To ensure your insulated water bottle bag is durable and long-lasting, choose high-quality fabric such as: 600D canvas, 900D canvas, polyester fabric, or nylon fabric. These materials are generally thick and sturdy, with good water resistance — making them the top choice for this type of bag.
Middle Layer
Manufacturers of insulated bags typically use PE foam for the middle layer. This foam padding is what helps preserve and maintain the temperature of food and beverages inside the bag.
Inner Fabric Layer
This is also one of the factors that directly affects the bag’s thermal performance. Therefore, you should choose a good-quality inner fabric to ensure both the durability of the bag and the quality of whatever drink or food you want to keep at temperature.
How to Sew an Insulated Bag Simply at Home
Materials Preparation

To make your own insulated water bottle bag at home, you will need to prepare the following materials:
- Piece #1: 1 strip of fabric measuring 4 × 55 cm (for the handle/strap)
- Piece #2: 2 pieces of plain fabric measuring 11 × 23.5 × 19.5 cm
- Piece #3: 2 fabric pieces + 2 PE foam pieces, each measuring 11 × 10.5 × 19.5 cm
- Piece #4: 2 patterned fabric pieces + 2 foam pieces, each measuring 19.5 × 15.5 cm
- Fabric, scissors, needle and thread, pins
Detailed Step-by-Step Instructions for Sewing an Insulated Bag
Even if you’re not particularly handy, you can still create a beautiful, one-of-a-kind handmade item that perfectly fits your own style. Let’s get started!

Lay the PE foam pieces one by one on the wrong side (reverse side) of the two 19.5 × 15.5 cm fabric pieces (Piece #4) and the two 11 × 10.5 × 19.5 cm fabric pieces (Piece #3). Then iron them so that the fabric and the foam stick firmly together.

Place the patterned fabric (Piece #4) on the bottom, then place the smaller fabric piece (Piece #3) on top. Note: Align the 19.5 cm edges of both pieces together. Then use the sewing machine to stitch these two edges together. Repeat the same process with the remaining Piece #4 and Piece #3.

After sewing Piece #4 and Piece #3 together, a seam will be formed. At this point, iron the seam open (press to either side) to flatten it out neatly.
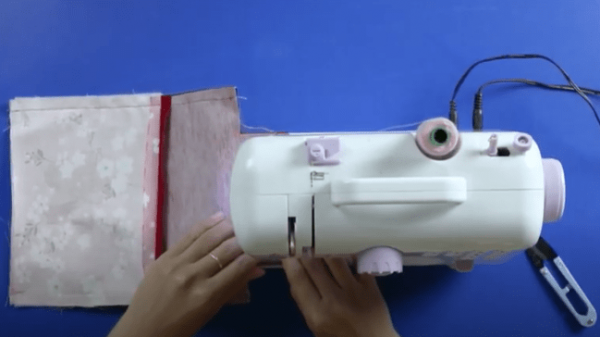
Fold the two panels created in Step 3 face-to-face, then use the sewing machine to stitch them into a bag shape. Once sewn, press open the seams again as in the previous step.
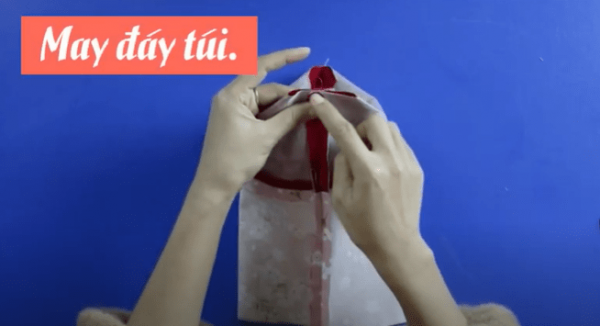
After completing Step 4, rotate the bag to a vertical position and fold the gap you left open in the previous step. Stitch it closed to form the bag’s bottom.

Repeat the same process as sewing the outer layer. However, this time leave a gap of approximately 6 cm on the left side seam of the bag. Then proceed to sew the bag’s bottom just as you did for the outer layer.

Turn the inner bag right-side out, then insert it into the outer bag. Stitch the bag’s opening (top edge) together. Once the top is sewn, turn the entire bag right-side out through the 6 cm gap you left in Step 6. Then stitch that gap closed.

Sew a topstitch approximately 1 cm from the edge all around the bag’s opening to give it a clean, finished look. At the same time, make the carry strap for the insulated water bottle bag.
Fold Piece #1 (the 4 × 55 cm strip) in half lengthwise and sew it into a strap. Once sewn, turn it right-side out. Then sew both ends of the strap to either side of the bag’s opening.
🎉 Conclusion
That’s it! We’ve just walked you through a simple How to sew an insulated bag (how to sew an insulated bag) right at home. As you can see, it’s really not that difficult to create your very own one-of-a-kind handmade item, is it? With this method, you can confidently make one as a gift for friends or family to bring to work, school, or outings — keeping their drinks perfectly hot or cold in the most convenient way possible.
Good luck, and enjoy your sewing! 🧵